How to deploy an application into Red Hat Fuse
How exactly do you deploy an application into JBoss Fuse and Apache Karaf?
And what is a ‘bundle’, really?
After reading this article you’ll be able to answer those two questions. You’ll know how to compile your application ready for JBoss Fuse, and then deploy it.
Let’s go!
Introducing the bundle
To understand how to deploy into JBoss Fuse, you first need to know that it isn’t like most other Java application servers. It’s a container for running a special type of Java application called an OSGi bundle.
An OSGi bundle is just a certain type of Java application. It looks pretty much like a .jar file, but it also has some metadata inside, which describes the application’s dependencies and configuration.
OSGi bundles are often just called bundles. They are the main “things” that you will deploy into JBoss Fuse.
You can create a bundle using Maven, just in the same way that you might create a JAR file. To do this, you add the Maven Bundle Plugin to your Maven POM, and set your packaging type to bundle.
Installing bundles into JBoss Fuse
Once you have created a bundle, and you want to deploy it into JBoss Fuse - known as installing a bundle - you should use the following command from the Fuse console:
osgi:install <mvn:your artifact>
The mvn: prefix means that JBoss Fuse will use Maven to look for the bundle. It look for your bundle in your local Maven repository, and it also searches a number of public repositories, such as Maven Central.
For example: to install a bundle with artifactId your-app and groupId com.example, you would use:
osgi:install mvn:com.example/your-app/1.0.0
How to deploy an application into JBoss Fuse, step-by-step
Now we’ve covered the basics, I’ll go through an example step-by-step.
Firstly I’m going to configure my Maven POM to support building an OSGi bundle. Then I’m going to deploy the bundle into JBoss Fuse, using the osgi:install command. Finally I’m going to check that it’s been installed.
-
In your Maven POM (
pom.xml), make sure that thepackagingproperty is set tobundle, and that you have added themaven-bundle-plugin, like this:<project xmlns="http://maven.apache.org/POM/4.0.0" xmlns:xsi="http://www.w3.org/2001/XMLSchema-instance" xsi:schemaLocation="http://maven.apache.org/POM/4.0.0 http://maven.apache.org/xsd/maven-4.0.0.xsd"> <modelVersion>4.0.0</modelVersion> <groupId>com.example</groupId> <artifactId>my-ace-bundle</artifactId> <version>0.0.1-SNAPSHOT</version> <packaging>bundle</packaging> ... <build> <plugins> <plugin> <groupId>org.apache.felix</groupId> <artifactId>maven-bundle-plugin</artifactId> <extensions>true</extensions> <version>2.3.7</version> </plugin> </plugins> </build> </project>This tells Maven to produce an OSGi bundle, suitable for Fuse.
-
Using Maven, compile your application into a bundle and install it into your local Maven repository:
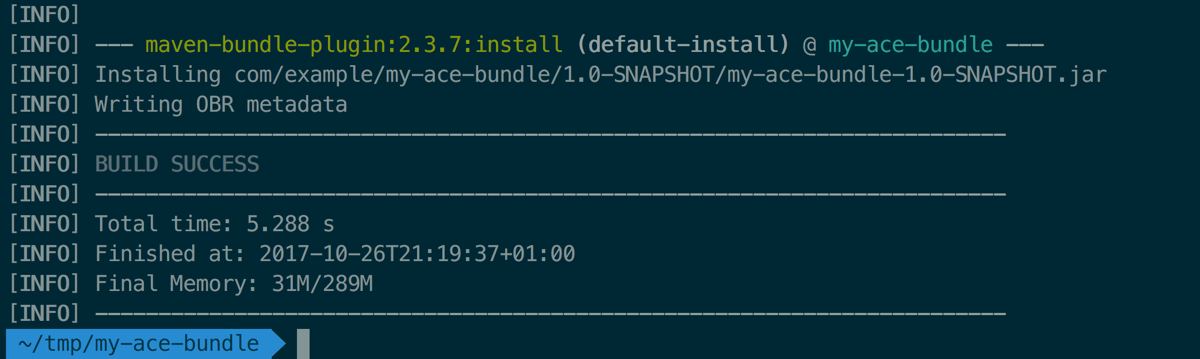
mvn clean installThe install target for Maven tells it to compile your application and then place the compiled artifact into your local Maven repository.
When the process completes successfully, you should see build success:
Your local Maven repository is usually located in
$HOME/.m2/repositoryorC:\Users\$USERNAME\.m2\repository. -
From the JBoss Fuse console, use the
osgi:installcommand to install your OSGi bundle from your Maven repository like this:osgi:install mvn:com.example/my-ace-bundle/1.0-SNAPSHOTYou should see your new bundle’s ID in the console:

This command uses Maven to resolve your artifact (using the
mvn:prefix). It searches your local Maven repository to find the artifact.Note that this doesn’t automatically start your bundle. To start a bundle, you can use the
osgi:startcommand, or add-stoosgi:install, which starts bundles automatically. -
To check that your bundle has been installed, you can use the
listcommand, and pipe the output intogrepto search for your bundle’s name, e.g.:osgi:list | grep my-ace-bundleYou should see your bundle listed like the screenshot below:

See how the bundle just says Installed, which means it isn’t started yet. So let’s do that…
-
Finally, to start the bundle, simply use the
osgi:startcommand, followed by the ID number of your new bundle:osgi:start 336Or, you can start your bundle by its symbolic name:
osgi:start com.example.my-ace-bundleNow you’ll see that the bundle will show as Active in the list:

This means your bundle is started and ready to go!
Summary
In this article I’ve touched briefly on the basics of how to deploy an application into JBoss Fuse. You should now know that:
- JBoss Fuse is an OSGi container
- An OSGi bundle is a special way of packaging a Java application
- You can build bundles using the Maven Bundle plugin
- Deploying a bundle into Fuse is easy using the
osgi:installcommand
Was this article useful for you? Or do you need any help deploying your first Fuse app? Post your comments in the box below. And if you liked the article, please share!
Comments
What do you think? You can use Markdown in your comment.
To write code, indent each line with 4 spaces. Or, to paste a lot of code, you can put it in pastebin.com and share the link in your comment.