How I use draw.io at the command line
2022 update: This article has been trimmed somewhat, after some good feedback in the comments!
What if….there was a decent, free, offline diagramming tool, that saves in a sensible text-based format (SVG), with an accompanying command-line interface, so you can easily generate bitmaps for sharing, unattended.
Well, I finally discovered it. It’s diagrams.net (formerly draw.io)! I’d heard about the web-based version, but I didn’t know that there is also a version for the desktop. It’s a cross-platform app developed in Electron, and you can run it on Windows, Mac and Linux.
Diagrams.net Desktop runs entirely locally. No web access is required, it doesn’t require an account, or fetching anything remotely. It has all the main features you’d expect for creating diagrams, including built-in shapes and themes. It’s really great, and it’s open source.
I’ve used it for a couple of projects now and I really like it. It meets my criteria of open source, looks good and actually works ✅.
So now time for an example.
My workflow for creating diagrams with Draw.io/Diagrams.net Desktop
Here’s my personal workflow for using Diagrams.net. We’ll create a trendy app / boring architecture diagram as SVG, add the source to a Git repo, and then build a PNG file so it can be shared over email, or included in another doc.
-
Install drawio.
🍏 On Mac - via Homebrew:
brew cask install drawio🐧 On Fedora - download the latest RPM package from the drawio-desktop’s GitHub Releases page, then install using
rpm:sudo rpm -i draw.io-x86-64-<version>.rpm -
Start Draw.io Desktop and create your diagram using the UI:

Creating a nonsensical flow chart in Drawio (other diagrams are available)
</figure>
-
Export it as an SVG (File > Export As > SVG).
Note: It isn’t mandatory to use SVG here, you could just save the
.drawiofile (the default), but I prefer to use SVG, because it is a more widely-used format. -
Commit the SVG into your Git repository if you like (probably a good idea so that you can share with others):
git add mydiagram.svg git commit -m "Made a diagram!" -
If you need the diagram in PNG format, you can use the
drawiocommand-line tool to generate it for you.🍏 On Mac - use the
draw.iobinary inside thedraw.io.apppackage. This example will scale the diagram to 250%, and output to PNG:/Applications/draw.io.app/Contents/MacOS/draw.io \ -x -f png --scale 2.5 -o published-diagram.png mydiagram.svg🐧 On Linux, just use the
drawiobinary:drawio -x -f png --scale 2.5 \ -o published-diagram.png mydiagram.svgNow you have your SVG as a high-res PNG, which you can use anywhere! (The image doesn’t look great here, but that’s because it’s been resized for web)
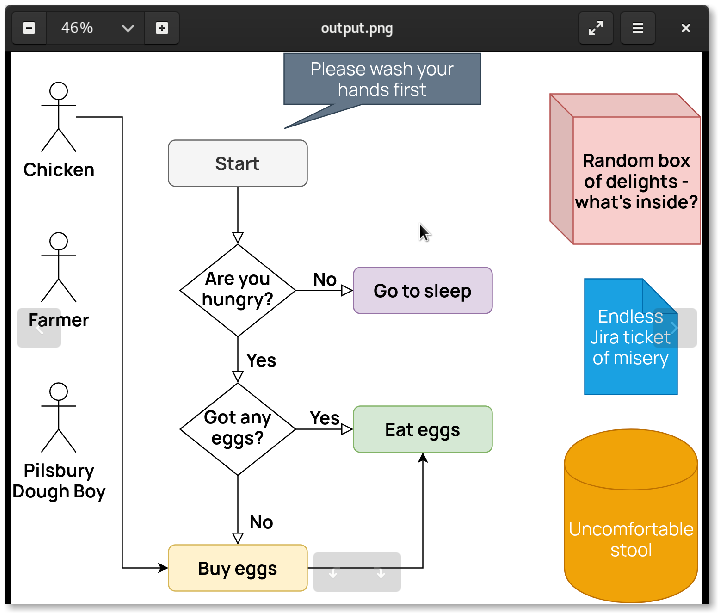
Diagram exported as a PNG
</figure>
-
If you’re using the generated diagram in a document (like a Markdown or Asciidoctor document), then just regenerate the diagram whenever you build your PDF.
For example, when I’m writing an Asciidoctor document, I create a build script
build.shlike this, which generates the image first, then builds my PDF:#!/bin/sh # Update the PNG render of the diagram drawio -x -f png --scale 2.5 \ -o images/architecture.png images/architecture.svg # Generate a PDF with Asciidoctor bundle exec asciidoctor-pdf \ -a pdf-fontsdir="./fonts/;GEM_FONTS_DIR" \ ./my-big-document.adocThen I just run this script whenever I want to build the PDF for sharing.
-
Whenever you need to update the diagram, just open the SVG in Draw.io Desktop and make your changes. Then rebuild using the command-line, or your build script.
You could add this step to your build pipeline (e.g. if you’re building a website or PDF as part of your build process.)
What else can draw.io do?
There’s a bunch of options you can pass to the command-line tool. For more info, check out the command-line help for drawio:
$ drawio --help
Usage: drawio [options] [input file/folder]

Options:
  -V, --version                      output the version number
  -c, --create                       creates a new empty file if no file is passed
  -k, --check                        does not overwrite existing files
  -x, --export                       export the input file/folder based on the given options
  -r, --recursive                    for a folder input, recursively convert all files in sub-folders also
  -o, --output <output file/folder>  specify the output file/folder. If omitted, the input file name is used for output
                                     with the specified format as extension
  -f, --format <format>              if output file name extension is specified, this option is ignored (file type is
                                     determined from output extension, possible export formats are pdf, png, jpg, svg,
                                     vsdx) (default: "pdf")
  -q, --quality <quality>            output image quality for JPEG (default: 90)
  -t, --transparent                  set transparent background for PNG
  -e, --embed-diagram                includes a copy of the diagram (for PNG format only)
  -b, --border <border>              sets the border width around the diagram (default: 0)
  -s, --scale <scale>                scales the diagram size
  --width <width>                    fits the generated image/pdf into the specified width, preserves aspect ratio.
  --height <height>                  fits the generated image/pdf into the specified height, preserves aspect ratio.
  --crop                             crops PDF to diagram size
  -a, --all-pages                    export all pages (for PDF format only)
  -p, --page-index <pageIndex>       selects a specific page, if not specified and the format is an image, the first
                                     page is selected
  -g, --page-range <from>..<to>      selects a page range (for PDF format only)
  -h, --help                         display help for command