Jenkins shared library: tutorial with examples
You’re getting up to speed with Jenkins now and you’re mastering the art of the pipeline. But now you’ve got a few projects up and running, how do you avoid repeating the same common code across different pipelines?
I often write code that I know will be reused across several different pipelines in Jenkins. Copying and pasting the same code into different pipelines can quickly become a maintenance headache.
So to avoid this, you store your “reusable bits” (technical term!) in a Shared Library in Jenkins. You only need to write some code once, and then you can reference the same code in all of your pipelines.
This Jenkins pipeline shared library tutorial will tell you the basics of setting up a shared pipeline, how to load the library, and how to use it in your pipelines.
What to reuse in Jenkins
If you’re already writing code in your pipelines to do anything like this:
- verify the deployment environment
- perform a deployment
- read a configuration file (e.g. a Maven POM file)
- perform a code review of the application (e.g. using a tool like SonarQube)
…then you’ll probably be better off putting the code for these into a shared library, so that lots of different projects can use them.
Over time, you’ll build up a collection of these reusable functions in your Library.
What is a Shared Library
A shared library is a collection of independent Groovy scripts which you pull into your Jenkinsfile at runtime.
The best part is, the Library can be stored, like everything else, in a Git repository. This means you can version, tag, and do all the cool stuff you’re used to with Git.
-
First you create your Groovy scripts (see below for details on this), and add them into your Git repository.
-
Then, you add your Shared Library into Jenkins from the Manage Jenkins screen.
-
Finally, you pull the Shared Library into your pipeline using this annotation (usually at the top of your Jenkinsfile):
@Library('your-library-name')
What’s inside a Shared Library
Inside your Library you’ll probably have two types of common code.
-
Steps: These are called Global Variables in Jenkins terminology, but these are the custom steps that you want to be available to all your Jenkins pipelines.
For example, you might write a standard step to deploy an application, or perform a code review. To do this, add your code into
vars/YourStepName.groovyand then implement adef callfunction:#!/usr/bin/env groovy // vars/YourStepName.groovy def call() { // Do something here... } -
Other common code: This might include helper classes, or common code that you might want to include inside pipeline steps themselves (meta!). You could also use it as a place to store static constants that you use throughout your pipelines.
Code like this needs to go in the
src/your/package/namedirectory, and then you can use normal Groovy syntax, e.g. this file,xyz/tomd/GlobalVars.groovy:#!/usr/bin/env groovy package xyz.tomd class GlobalVars { static String foo = "bar" }You can then
importthis class into your Jenkinsfile and reference the static variable likeGlobalVars.foo.
Example: Creating and using a Jenkins shared library
In this section I’ll show you how to set up a shared library in Jenkins, with a quick example.
-
Create the shared library
First you need to create a Git repository which will contain your library of functions (steps). You can also use Subversion.
In your repository, create a directory called
vars. This will hold your custom steps. Each of them will be a different.groovyfile underneath yourvarsdirectory, e.g.:vars/ deployApplication.groovy parseFile.groovy sayHello.groovy readSystemCredentials.groovy doCodeReview.groovyI’m using Git to store my repository. I’ve created a sample repo on GitHub, which includes one function, the
sayHelloexample from the official Jenkins documentation.See the example repository on GitHub
-
Add your custom steps
Each of your custom steps is a different
.groovyfile inside yourvars/directory. In Jenkins terminology, these are called Global Variables, which is why they are located insidevars/.Create a file for your custom step, and fill in the code. For example, a simple greeting function would look like this:
#!/usr/bin/env groovy

def call(String name = 'human') {
    echo "Hello, ${name}."
}
Notice how the Groovy script must implement the
callmethod. Then you should write your custom code within the braces{ }. You can also add parameters to your method - the example above has one parametername, with a default value ofhuman. -
Set up the library in Jenkins
Now you’ve created your library with custom steps, you need to tell Jenkins about it.
You can define a shared library within a Jenkinsfile, or you can configure the library using the Jenkins web console. I think it’s better to add from the web console, because you then you can share the library across all of your build jobs.
To add your shared library (I’m using my demo repository on GitHub as an example):
In Jenkins, go to Manage Jenkins → Configure System. Under Global Pipeline Libraries, add a library with the following settings:
-
Name:
pipeline-library-demo -
Default version: Specify a Git reference (branch or commit SHA), e.g.
master -
Retrieval method: Modern SCM
-
Select the Git type
-
Project repository:
https://github.com/monodot/pipeline-library-demo.git
-
-
Use the library in a pipeline
To use the shared library in a pipeline, you add
@Library('your-library-name')to the top of your pipeline definition, or Jenkinsfile. Then call your step by name, e.g.sayHello:@Library('pipeline-library-demo')_ stage('Demo') { echo 'Hello world' sayHello 'Dave' }NOTE: The underscore (
_) is not a typo! You need this underscore if the line immediately after the@Libraryannotation is not animportstatement.If you’re using declarative pipeline syntax….
libraries { lib('pipeline-library-demo') } pipeline { // Your pipeline would go here.... } -
Run the pipeline above, and the output should look something like this:
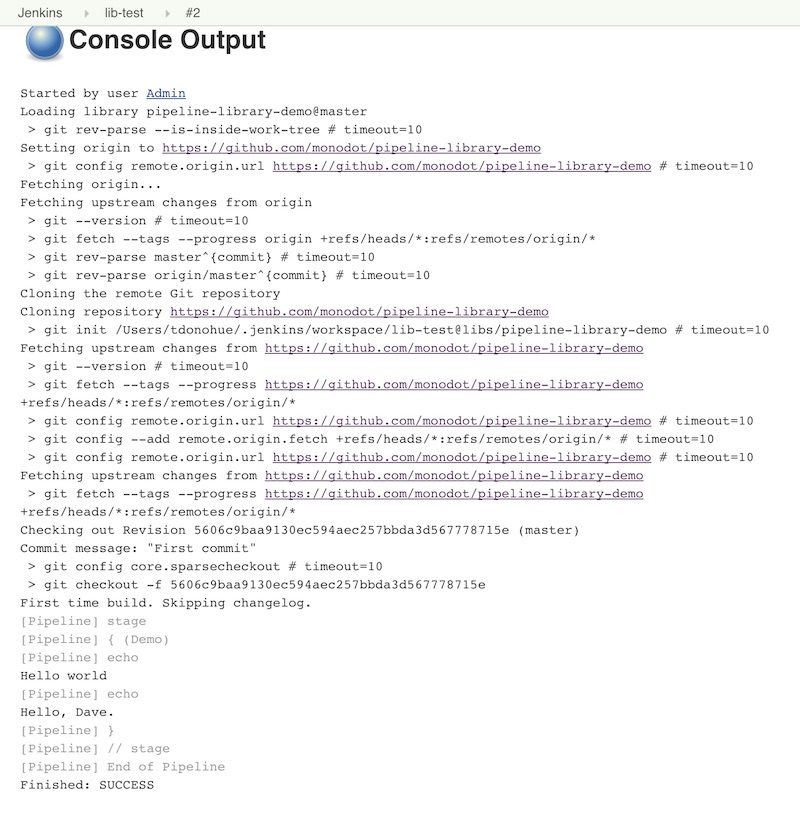
Sample job output from Jenkins
</figure>
When you don’t have Jenkins admin access
If you can’t set up the pipeline library because you don’t have access to the Manage Jenkins area, or you want to do some advanced customisation, then you can import the library explicitly in a pipeline.
Here’s a skeleton declarative pipeline which imports a library by specifying a retriever, which fetches a protected Git repo. The retriever will authenticate to the repository using the credentials identified by your-credentials-id:
library identifier: 'mylibraryname@master',
    //'master' refers to a valid git-ref
    //'mylibraryname' can be any name you like
    retriever: modernSCM([
      $class: 'GitSCMSource',
      credentialsId: 'your-credentials-id',
      remote: 'https://git.yourcompany.com/yourrepo/private-library.git'
])

pipeline {
    agent any
    stages {
        stage('Demo') {
            steps {
                echo 'Hello world'
                yourCustomStep 'your_arg'
            }
        }
    }
}
Summary (TL;DR)
That’s it for my intro to Shared Libraries in Jenkins! As you can see they’re a useful way to share common code that you might use across different Jenkinsfiles.
Here are the important things to remember:
- You need to use Groovy to write your custom functions or steps
-
To write pipeline steps that you can call from your pipelines (e.g.
deployApplication,readConfigFile, etc.):-
Create a file in the
vars/directory in your repository, with the name of your custom step -
The file should implement the
def call()method; you can also define parameters to your step
-
-
To write other common Groovy code, add it into
src/ - Add your Shared Library in Jenkins using the Configure System screen
Thanks for reading! I hope you’ve found this example Jenkins pipeline library useful.
How are you using Jenkins pipelines? Any feedback on this article? You’re very welcome to post your thoughts in the comments section below.