Deploy and use the Nexus Docker registry in OpenShift
You probably know that OpenShift comes with its own internal image registry.
But if you want to have a better idea of how imagestreams and Docker registries work with OpenShift, then you might want to try deploying your own Docker registry.
It’s useful to have your own, independent registry to be able to play around with. You can use it to see how OpenShift interacts with other image registries. Or you can use it as another way of getting images into your cluster, if you don’t want to expose OpenShift’s internal registry to the outside world.
In this article I’ll walk through deploying an independent Docker image registry inside OpenShift, using the free, open source Nexus 3 from Sonatype.
Deploying Nexus in OpenShift
Why Nexus? If you’re a Java developer, then you’re probably already familiar with Nexus. In version 3, Nexus got a complete facelift, and now you can use it to store your container images as well. It’s free, it’s open source, and it’s already been containerised by Sonatype. So it’s a good choice to use as a Docker registry.
In this walkthrough I’m going to use the Nexus quickstart template for OpenShift on GitHub, which uses the official Sonatype Nexus image.
Then I’m going to show you the steps you need in order to create a Docker registry in Nexus, and then expose it from OpenShift.
Side note: Hey! Hello! Hi! This guide is not intended for setting up an instance of Nexus in production. It’s meant to be just used for learning, or for a local demo.
Deploy a Nexus Docker registry in OpenShift - step by step
-
Fire up your OpenShift cluster
As I’ve written above, I’m going to use minishift. This tool spins up a pre-configured OKD (OpenShift) cluster for you. I’m going to use it to pull down the latest version of OpenShift Origin. At the time this article is being updated, the latest version is 3.10.
I run this command to start a cluster using Minishift, running OKD 3.10, using VirtualBox as the virtualisation provider (check the Minishift docs if you want to use a different one):
$ minishift start --memory 4GB \
    --vm-driver virtualbox \
    --openshift-version "v3.10.0"
Tip: You should probably run this tutorial on a machine with 16GB of RAM or more.
-
Deploy the Nexus container image
We’ll deploy Nexus using my fork of the OpenShift template originally provided by the OpenShiftDemos team on GitHub. (Or, you can create your own template, if you prefer to customise things a bit more.)
The template in the original repository uses the official Nexus 3 image (
sonatype/nexus3). I’ve forked the repo, and added some extra configuration to claim a Persistent Volume for Nexus’s data.I’ve also customised this template to change some memory parameters and the deployment strategy.
The template assumes that you already have at least one Persistent Volume (PV) available in your cluster. PVs are buckets where your containers can permanently store application data. We need PVs when we deploy an application that has state like Nexus. Otherwise, when our Nexus container is restarted, its configuration will be lost.
If you’re using minishift, then it creates 100 persistent volumes for you automatically :) . If you’re using another OpenShift cluster, then check the OpenShift docs on how to create and access Persistent Storage in your cluster.
From the command line, log in to OpenShift using oc login and then run these commands to deploy Nexus in a container in OpenShift:
$ oc new-project nexus
$ oc create -f https://raw.githubusercontent.com/monodot/openshift-nexus/master/nexus3-persistent-template.yaml
$ oc new-app nexus3-persistent
This will take a few minutes to deploy. You can check the status of pods using
oc get pods -w.When Nexus has been successfully deployed, you can get the URL from the OpenShift web console by browsing to Applications → Routes.
The URL will be something like
http://nexus-nexus.192.168.99.100.nip.io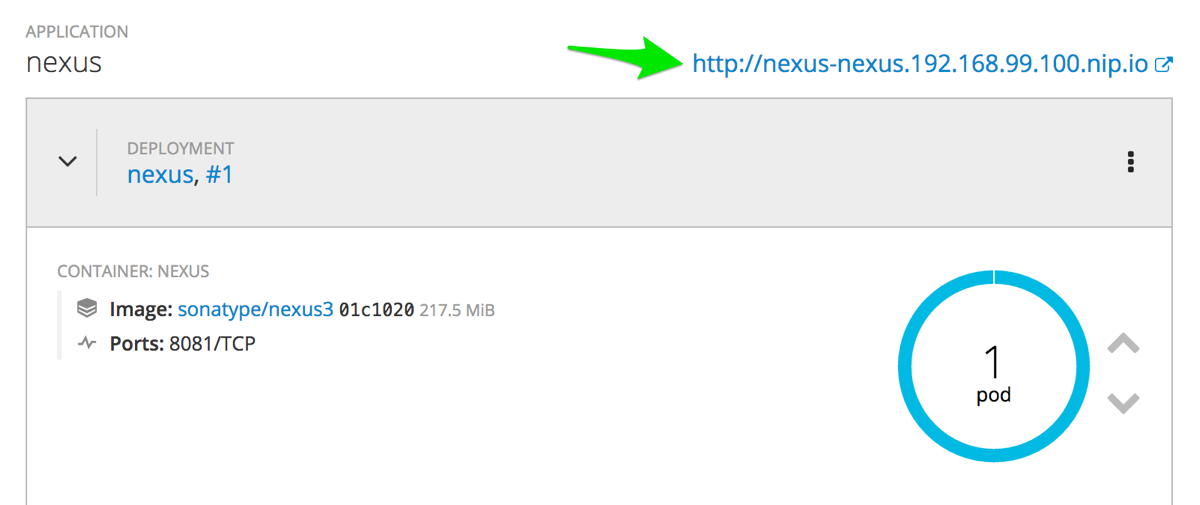
Note that Nexus will take a few minutes to start. Once it has started, we need to create our Docker registry.
You will also notice that a Persistent Volume Claim (PVC) has been created, so that Nexus can store data permanently. Use
oc get pvcto view the list of PVC objects. -
Create a Docker registry in Nexus
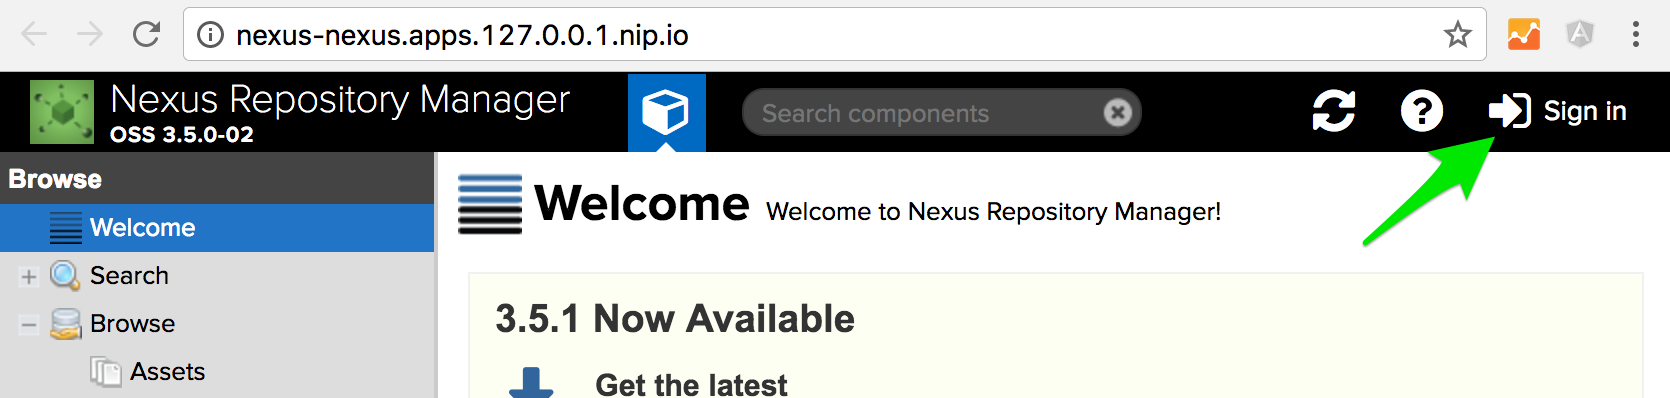
Go to the Nexus URL you grabbed from the web console above, click Sign in and log in with the default username admin and password admin123.
Click the cog / gear icon to go into Configuration.

Choose Repository → Repositories in the left hand menu.
Click Create Repository then choose docker (hosted).
Give the repository a name, e.g. docker, and then check the HTTP box and give a port number of 5000.
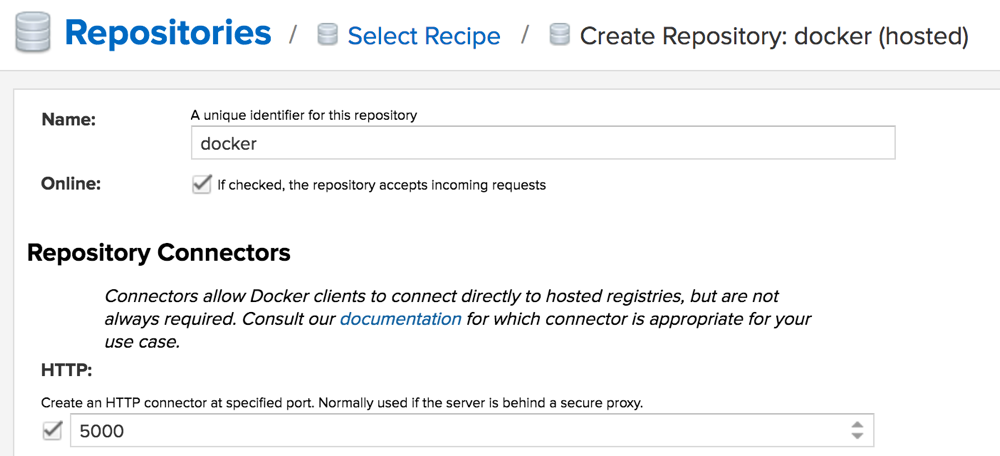
Then click the Create repository button.
-
Expose the registry port
We now have a fully-functioning Docker registry. But in order to be able to access it from outside the OpenShift cluster, we need to create a Route to it. This will allow us to push to the Docker registry from the desktop.
First, expose port 5000 in the nexus container. This is done by editing the DeploymentConfig. You can either edit the object directly using oc edit, or using the Web Console, or you can use the oc patch command. oc patch allows you to make a change to an object in OpenShift, in a single command.
In my case, I’m going to use oc patch. I’m going to patch the list of container ports in the DeploymentConfig definition, and add port 5000 to that list. In other words, I’m going to add 5000 as a new exposed port:
$ oc patch dc nexus -p '{"spec":{"template":{"spec":{"containers":[{"name":"nexus","ports":[{"containerPort": 5000,"protocol":"TCP","name":"docker"}]}]}}}}'This will automatically kick off a new deployment, so Nexus will take a minute or two to restart.
Now we’ve exposed that port in the container, we want to add that port to a Service, which we’ll call nexus-registry:
$ oc expose dc nexus --name=nexus-registry --port=5000 -
Create a secure (TLS) route to the Registry (optional)
Next we create a Route so that this new Service is accessible externally. Docker expects registries to be “secure” (TLS encrypted).
We’ll encrypt traffic using OpenShift’s edge SSL termination. When this option is chosen, the service will be exposed externally on port 443. A very basic way of doing this is using:
$ oc create route edge nexus-registry --service=nexus-registryHOWEVER! If you’re following this guide using minishift, or another local demo OpenShift cluster then you’re probably going to need to create a certificate for this service. So follow the steps below to create a root certificate authority (CA), a certificate for your service, and then configure Docker to trust your cert.
First I create a root certificate authority (CA) using
openssl:$ NEXUS_HOSTNAME=nexus-registry-nexus.192.168.99.100.nip.io $ openssl genrsa -des3 -out rootCA.key 4096 $ cat << EOF > openssl.conf [ req ] distinguished_name=dn [ dn ] [ root_ca ] basicConstraints = critical, CA:true EOF $ openssl req -x509 -config openssl.conf \ -extensions root_ca -new -nodes \ -key rootCA.key -sha256 -days 1024 \ -subj "/CN=EggRootCertificate" \ -out rootCA.crtNow create a certificate signing request (CSR) for your Nexus registry route and sign it with the root CA:
$ openssl genrsa -out ${NEXUS_HOSTNAME}.key 2048

$ openssl req -new -sha256 \
    -key ${NEXUS_HOSTNAME}.key \
    -subj "/C=GB/ST=London/L=London/O=EggCorp/CN=${NEXUS_HOSTNAME}" \
    -out ${NEXUS_HOSTNAME}.csr

$ openssl x509 -req -in ${NEXUS_HOSTNAME}.csr \
    -CA rootCA.crt -CAkey rootCA.key \
    -CAcreateserial -out ${NEXUS_HOSTNAME}.crt \
    -days 500 -sha256
Now create the Route, using the certificate, key and CA certificate:
$ oc create route edge nexus-registry --service=nexus-registry \
    --hostname=${NEXUS_HOSTNAME} \
    --key=${NEXUS_HOSTNAME}.key \
    --cert=${NEXUS_HOSTNAME}.crt \
    --ca-cert=rootCA.crt
Success! Now your Nexus Docker registry should be available outside OpenShift. To check the URL, type:
$ oc get route | grep registryThis will show you the URL that you should use with Docker.
-
(Optional) Configure Docker to trust the OpenShift certificates
If you want to be able to push and pull images using Docker on your host machine then you’ll need to add the relevant certificates to Docker’s truststore.
To get Docker for Mac to trust your certificate, you need to add it into Mac OS’s Keychain, like this:
$ sudo security add-trusted-cert -d \
    -r trustRoot \
    -k /Library/Keychains/System.keychain \
    rootCA.crt
Now restart Docker for Mac. If you’re still having issues with “certificate signed by unknown authority” then try restarting your Mac entirely (fixed it for me).
For Docker on other platforms, consult the Docker documentation.
Success! Now your Nexus Docker registry should be available outside the cluster at something like:
https://nexus-registry-nexus.192.168.99.100.nip.io. To check it:docker login nexus-registry-nexus.192.168.99.100.nip.io -
Allow OpenShift to pull images from your Docker registry
When you first create an OpenShift cluster, it’s configured to only allow images from a specific list of registries. This is so that you can control which registries you want to allow images from.
To allow OpenShift to pull an image from our new registry, we’ll need to specifically add it.
This step is important, because if we don’t add our new registry to the allowed list, OpenShift will throw an error (“importing images from registry […] is forbidden, only images from …. are allowed”).
To add our new registry, we need to edit OpenShift’s configuration file,
master-config.yaml.If you’re using oc-cluster to run your OpenShift cluster, then this file will be located on your host computer, so it’s easily editable. It’s located in
$HOME/.oc/profiles/<profile-name>/config/master/master-config.yaml.Inside the file, find the section
imagePolicyConfig: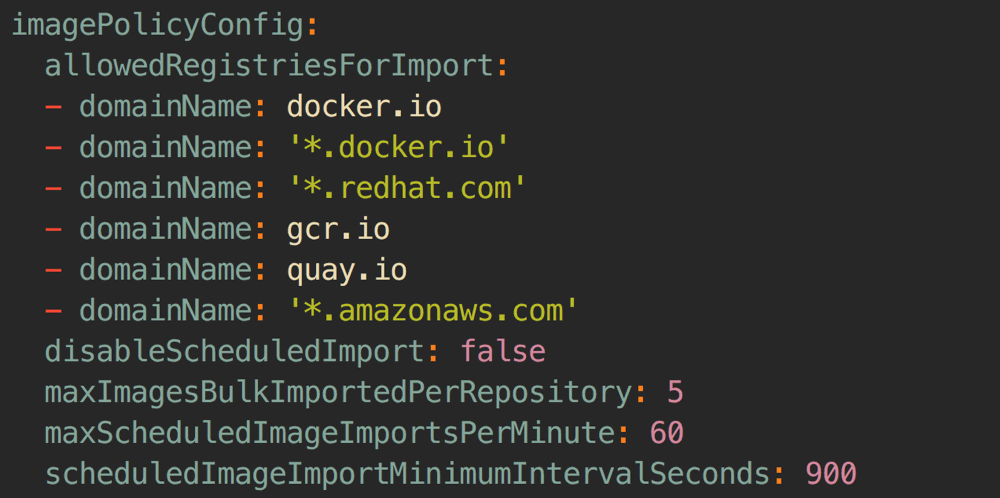
Add a new entry:
- domainName: '*.127.0.0.1.nip.io:443'
  insecure: true
Note: you will need to restart your OpenShift master after making this configuration change. If you’re using oc-cluster, just type
oc-cluster downandoc-cluster up <cluster-name>.Extra note: Why specify port 443? Because this is the port we’re exposing our registry on. The default Docker registry port is usually 5000, so because we’re using a different port, we should explicitly specify it here.
Now your Docker registry is configured, exposed outside OpenShift and ready for you to push and pull images!
And that’s it for now! In another article I’ll cover how to push images to this registry from your host computer, and pull images and deploy them into your OpenShift cluster.