SSL mutual authentication in Talend ESB
To beef up security, some web services may require you to use SSL mutual authentication.
This article shows you how to set up mutual (2-way) SSL when invoking a REST web service from a Talend Route, using self-signed certificates.
What is mutual authentication?
Mutual authentication, also known as 2-way SSL, is when a client and server both authenticate themselves to each other.
This method is often used when a server wants to assure the client’s identity. This is especially useful in web services, when a server may want to make a web service available to trusted clients only.
2-way SSL is achieved using certificates on both sides. In a traditional SSL exchange, only the server presents a certificate. But in 2-way SSL, both client and server present their certificates to each other.
This gives rise to a sequence of events like this:
- A client sends a request to a server.
- The server identifies itself to the client by sending its certificate.
- The client receives the server’s certificate and verifies it.
- The client identifies itself to the server by sending its certificate.
- The server receives the client’s certificate and verifies it.
- If all steps are successful, the server grants access.
In this article, you will use Java’s keytool utility to generate your private key and send it to your external partner for signing. You’ll add the signed certificate into a keystore and configure the Talend Route to use this certificate when invoking a web service.
SSL mutual authentication setup
This part of the process is not unique to Talend, but for completeness I’ve included it in this tutorial.
Step 1: Generating a certificate and getting it signed
First, generate a private key. You use this to generate a certificate signing request, which you send to the other party. The other party signs this request and returns a file back to you.
Follow these steps to generate a private key and certificate signing request:
-
Check you have openSSL installed:
- Mac users: openSSL is already installed. You can access it from Terminal.
- Windows users: I recommend Cygwin, the Linux environment for Windows. Or you can use an openSSL build for Windows.
-
Drop to a Terminal, Cygwin or command line.
-
Generate a private key and certificate signing request using
openssl req -newkey rsa:2048 -keyout mykey.key -out mykey.req -
You will be prompted for various properties, such as location, key name, etc.
-
When prompted, enter a PEM pass phrase. You must remember this as you will need it below.
-
Ignore the option to supply a challenge password or company name.
-
Send only the generated
mykey.reqfile to the other party to be signed. Do not send the private key (mykey.key) file.
The other party should sign using their certificate and return a .pem file. This is your signed certificate file.
Step 2: Add your private key and signed certificate into a new local keystore
Now you need to add your private key and the signed certificate into a local keystore so that Java can use it. You should keep this file in a secure location where few people can access it. Usually this is in JAVA_HOME/jre/lib/security.
To add your key and certificate to a new local keystore:
-
Ensure you have the private key (
.key) file you generated, and the matching certificate (.pem) signed by the other party. -
Drop to a Terminal, Cygwin or command line.
-
Create a bundle file containing both your key and certificate – from this you will create your keystore:
openssl pkcs12 -export -in mykey.pem -inkey mykey.key -certfile mykey.pem -name "mykey" -out mykeystore.p12 -
You will be prompted for a pass phrase for the private key (this is the PEM passphrase you chose earlier).
-
You will be prompted for an export password. Remember the password; you will need it below when importing the keystore.
-
When openssl has finished, it will create your new bundle file,
mykeystore.p12. -
Copy the new bundle file to
$JAVA_HOME/jre/lib/security. -
Use Java’s keytool (it’s in
$JAVA_HOME/bin) to create a keystore using the bundle file just created. From your$JAVA_HOME/jre/lib/securityfolder:../../bin/keytool -importkeystore -srckeystore mykeystore.p12 -srcstoretype pkcs12 -destkeystore client-keystore.jks -deststoretype JKS -
When prompted, give a destination password. Choose a secure password, as it gives access to your private key!
-
When prompted, give the source password that you chose in step 5, above.
When openssl has finished, you can verify that the private key is added using:
../../bin/keytool -list -v keystore client-keystore.jks
Enter your password when prompted. This will print all items in your keystore – both your private key and certificate.
Step 3: Add the remote CA to your trust store
You now need to add the other party’s root certificate to your trust store. This tells Java to trust the certificate, and any others signed by it.
-
Ensure you have the root certificate (
.pem) supplied by the other party. -
Use Java’s keytool to add the root certificate to the trust store
../../bin/keytool -importcert -keystore client-truststore.jks -file otherparty.pem -
When prompted, choose a password for the trust store.
-
When prompted whether to trust the certificate, answer yes.
Configuring the Route
From this point, configuring the Talend Route to use 2-way SSL is fairly straightforward.
SSL configuration is done by using a bean of a certain class, SSLContextParameters. You instantiate a bean, use its setter methods to add your SSL parameters, and then pass this bean to an HTTP component. This approach is documented on Camel’s configuration utilities page.
In this tutorial I use the HTTP4 component to invoke a REST service. It’s not available as a drag-and-drop component out of the box in Talend Studio, but it’s easy to set up using a cMessagingEndpoint.
Step 4: Add SSL configuration into your Talend Route (Camel)
The configuration bean, SSLContextParameters, needs to be created and registered in the camel context. The HTTP4 component uses this bean to determine what SSL configuration to use when making the connection to the web service.
- Add 5 context variables to the Route and configure for each environment:
- keyStorePath (e.g.
C:/Program Files/Java/jdk1.7.0_51/jre/lib/security/client-keystore.jks) - keyStorePassword (e.g.
changeit) - keyPassword (e.g.
changeit) - trustStorePath (e.g.
C:/Program Files/Java/jdk1.7.0_51/jre/lib/security/client-truststore.jks) - trustStorePassword (e.g.
changeit)
- keyStorePath (e.g.
- Add a cBeanRegister component with the following details:
- Id:
"sslContextParameters" - Select the Customised option, then:
Add the following class imports:
 import org.apache.camel.util.jsse.SSLContextParameters;
 import org.apache.camel.util.jsse.KeyStoreParameters;
 import org.apache.camel.util.jsse.KeyManagersParameters;
 import org.apache.camel.util.jsse.TrustManagersParameters;
Add the following code:
KeyStoreParameters kspKeys = new KeyStoreParameters(); kspKeys.setResource(context.keyStorePath); kspKeys.setPassword(context.keyStorePassword); KeyManagersParameters kmp = new KeyManagersParameters(); kmp.setKeyStore(kspKeys); kmp.setKeyPassword(context.keyPassword); KeyStoreParameters kspTrust = new KeyStoreParameters(); kspTrust.setResource(context.trustStorePath); kspTrust.setPassword(context.trustStorePassword); TrustManagersParameters tmp = new TrustManagersParameters(); tmp.setKeyStore(kspTrust); beanInstance = new SSLContextParameters(); ((SSLContextParameters) beanInstance).setKeyManagers(kmp); ((SSLContextParameters) beanInstance).setTrustManagers(tmp); - Id:
Step 5: Invoke the remote web service
To invoke the web service, I use the camel-http4 component (based on Apache HttpClient 4.x). It’s not included as a standard drag-and-drop component, so you have to use a cMessagingEndpoint to add it. It’s a little bit easier to configure for SSL than the standard cHttp (which is based on HttpClient 3.x):
- Add a cSetHeader component to the Route. Set the following properties:
- Name:
org.apache.camel.Exchange.CONTENT_TYPE - Language: Constant
- Value:
"text/xml"
- Name:
- Wire the cSetHeader to a cMessagingEndpoint component. Set the following properties:
- URI:
"https4://HOSTNAME:PORT/path/to/service?sslContextParametersRef=sslContextParameters" - On the Advanced settings tab, add a dependency for http4.
- URI:
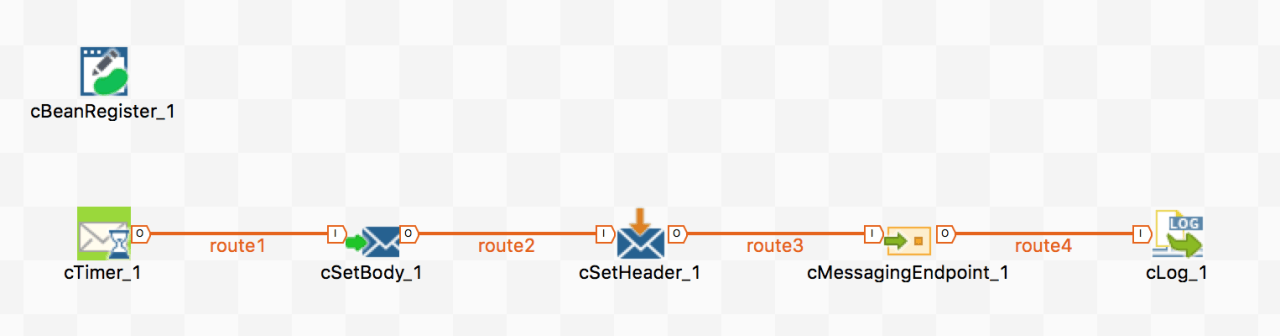
When finished, your Route should look something like the diagram below. Note that I’ve added the following extra components:
- a cTimer, to start the route for testing purposes
- a cSetBody, so I can set a test payload to invoke the web service with
- a cLog, so that I can log the response from the web service
Pro tip: To aid debugging or troubleshooting, add the following JVM startup parameter (from the Run window) to see SSL debug output in the Console: -Djavax.net.debug=ssl:handshake
If you’re accessing web services from behind a proxy, you should add the following to the end of your URI: &proxyAuthHost=PROXY_HOST&proxyAuthPort=PROXY_PORT&proxyAuthScheme=http4