Building a contact form API with Apache Camel and Quarkus
This is part 1 of a 2-part journey into creating an API with Apache Camel, then packaging, deploying and monitoring it on my server.
Can I use Apache Camel to help me receive contact form submissions on this very blog? And can I host it on my own server? And what are the results?
Let’s find out….
What’s the reason for this project?
I’ve been running this web site for a few years now. It’s a static website, which means it’s a bunch of HTML files served from a server. There’s no PHP, no WordPress, and no dynamic functionality.
I also occasionally receive messages from lovely readers like yourself, in the time-honoured way: through an HTML contact form.
Contact form submissions have to be processed by something. Some sort of API or service which can take the form data and send it to my email address.
Previously, I used a third-party service which processes contact forms (using their starter/free tier). But the service seemed to stop working, without me knowing.
Nightmare. This is the downside of the API economy. You’re at the mercy of someone else’s service. Especially if you’re on their free tier.
Here’s the downside. If someone tried to send a message for a period of a couple of months, it never got to me, and I didn’t even realise it. If I was a business and I lost out on a bunch of customer enquiries, I’d be pretty screwed.
There are a couple of alternatives to this:
-
Pony up for a proper subscription to an app to process contact form submissions. (Maybe if I was a business, yes, but this is a personal blog, so no.)
-
Install someone else’s script on my little web server. (This is the boring, safe option but too easy, right?)
-
Develop my own API and self-host it. ✔ Saves money ✔ Gives me something to write about.
So basically I’m going to develop something.
(I know being cloud-native is all about using existing services where possible, but that would make for a boring blog article. ✋)
The context (my blog)
To give you a bit more background, here’s what I need the contact form API to do:
-
Receive fields from an HTML form: I need an HTTP endpoint (an API) to receive HTML form fields, and do something.
-
Send the details by email: When the form has been submitted, I want to send the results to my email address.
-
Persist the data to a database: I want to save all form submissions, in case anything goes wrong with the email.
-
Add some basic anti-spam protection - The spam-bots are numerous (there are probably some crawling around this site right now), but I’d like to add some basic protection against those annoying spam messages.
-
Redirect to a success or error page: Once the processing has finished, the user should be redirected to a page telling the user whether eveyrthing went OK. We can use the HTTP 303 redirect status code to do it.
-
Low usage: I don’t get many enquiries via the contact form (most people prefer to leave blog comments), so I’m not designing this with heavy load in mind.
I wrote down these requirements, and then recited them to myself, in a small, informal handing-over ceremony.
So I need to create a small integration, which receives some HTML form data, sends it via email, and then perhaps saves it somewhere, too. For the fun of it. For the blogging. And for a little weekend project to work on.
Wait… did somebody say integration? This sounds like a job for… Apache Camel. 🐪🐪
The tech stack
I’m a Java developer so it’ll be quicker if I use my existing knowledge rather than learning a new language or framework, just for the sake of one small API. So here’s the tech stack:
-
Quarkus: This is the Java framework I’ll be using. Quarkus is an alternative to Spring Boot, a framework for building Java apps, which comes with a curated set of third-party libraries for web services, integration, ORM, etc. Quarkus also boasts fast startup times, support for running in containers, and the option to compile to a native executable, so bypassing the JVM altogether.
-
Apache Camel: It’s my tool of choice for integration and APIs. And it runs on Quarkus. Great.
-
SQLite database: I’m going to use SQLite to store form submissions, because it’s extremely lightweight, and it means that I don’t need to run a dedicated database server. (I’m not expecting a deluge of contact form submissions!)
Here’s what I want the process to look like. This is a rough sketch of the Camel route that I’ll develop:
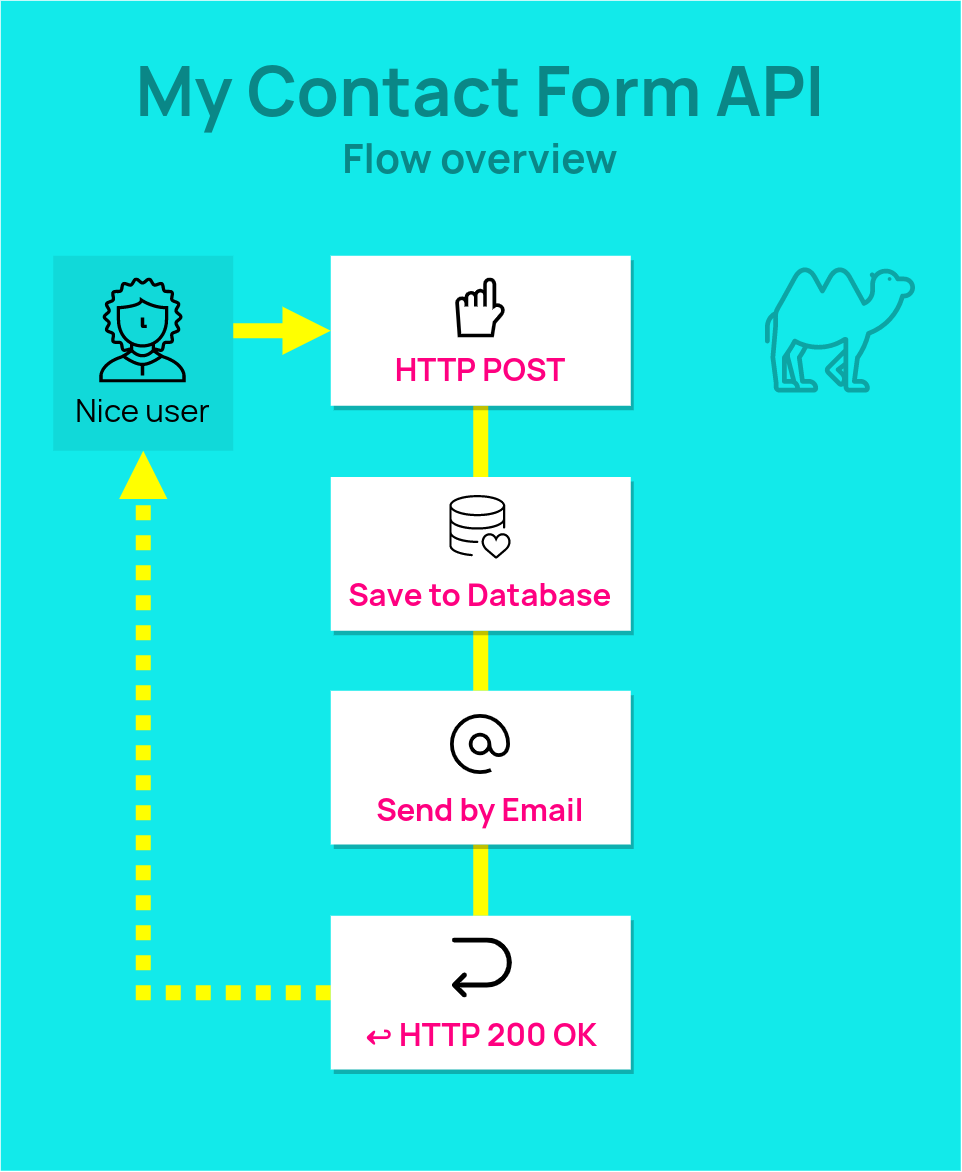
Doing it: creating the application
Step 1. Create an app at code.quarkus.io
I started out with the Quarkus app generator at code.quarkus.io. This tool creates a basic Quarkus app:
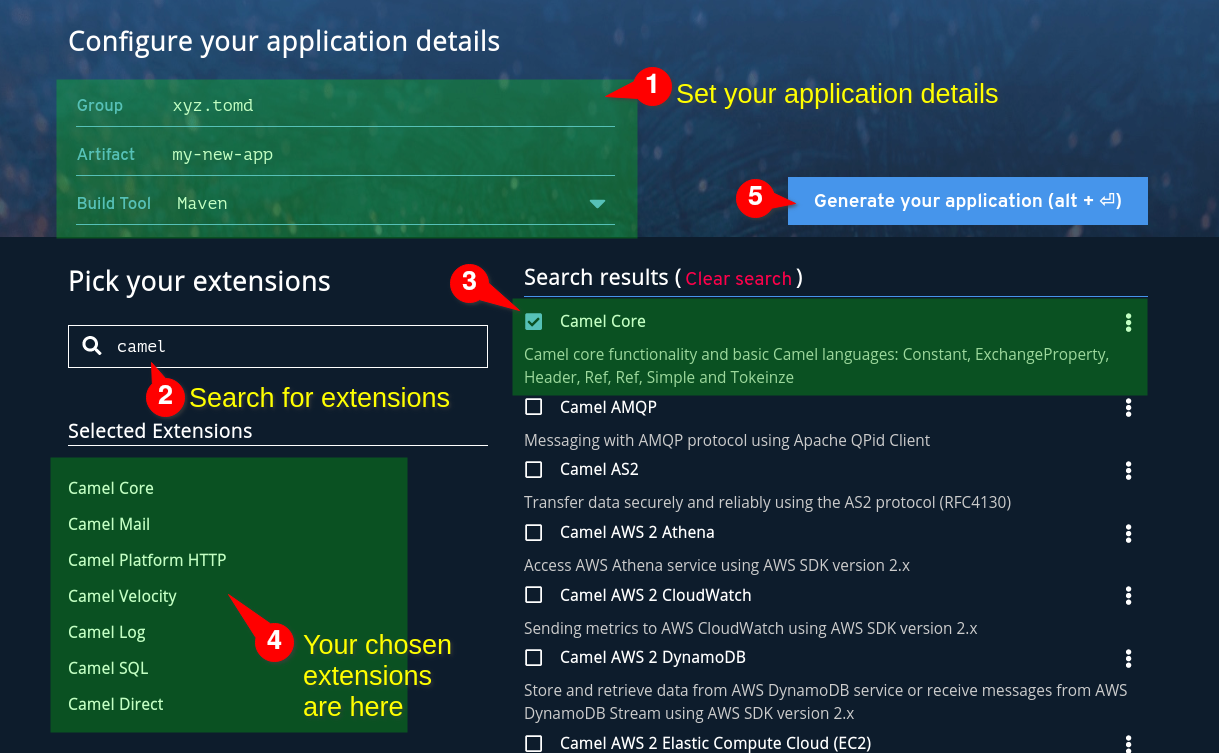
With the Quarkus app generator, I checked the extensions that I need. These are essentially the Camel components that I am going to use. Each Camel component is packaged into its own extension:
-
Camel Core
-
Camel Mail
-
Camel Log
-
Camel Velocity
-
Camel SQL
-
Camel Direct
Then I download the code and import it into my IDE. Now we’re good to start coding!
Step 2. Creating a Camel RouteBuilder class
To bootstrap Apache Camel in Quarkus, I need to create a new Camel RouteBuilder class, like this:
src/main/java/xyz/tomd/FormEmailerRouteBuilder.java:
import javax.enterprise.context.ApplicationScoped;
import org.apache.camel.builder.RouteBuilder;

@ApplicationScoped
public class FormEmailerRouteBuilder extends RouteBuilder {

    @Override
    public void configure() throws Exception {
        // Camel routes will go here...
    }
}
This class is annotated with @ApplicationScoped, which basically defines a bean in CDI (the dependency injection framework that Quarkus uses).
If you’re coming from Spring Boot land, you can think of ApplicationScoped as similar to the @Component annotation.
When Quarkus starts, it will instantiate this class as a bean. Camel Quarkus will see that it’s a RouteBuilder class, and will add the routes into the Camel Context.
Now the boilerplate stuff is done! Before I launch head-first into Camel, I’m going to define some business rules for receiving these form submissions……
Step 3. Defining the business rules
I have some validation rules for my API. I guess you could call them business rules - they can be defined in code.
I won’t accept just any old crap! I will only accept form submissions if:
-
The user has filled in all of the required fields.
-
The user has answered the anti-spam question correctly.
These rules can be expressed in Java code, and I don’t want to clutter up my Camel routes, so I will add them to a Predicate class.
A Predicate in Camel is just a way to filter or match a message. You can write a Predicate inside a Camel route, or you can write a Predicate separately in a Java method, and call it from a route. I prefer this option because it gives a nice clean separation between routes and business logic.
Create a Camel Predicate to validate form submissions
So I implement Camel’s Predicate interface, adding my custom logic into the boolean matches(Exchange exchange) method. This code will validate that all the required fields have been filled in, and the anti-spam question is correct.
A couple of things to explain about this code:
-
When Apache Camel receives form submissions, it places each form field value in a Header. So the code uses the
Exchange.getMessage().getHeader(...)to check that the required fields exist. -
I want my antispam answer, and list of required fields, to be configurable, not hard-coded. So I store these values in Quarkus properties, and inject them using
@ConfigProperty(this feature comes from Eclipse MicroProfile Config:
src/main/java/xyz/tomd/SubmissionValidPredicate.java:
import org.apache.camel.Exchange;
import org.apache.camel.Predicate;
import org.eclipse.microprofile.config.inject.ConfigProperty;

import javax.enterprise.context.ApplicationScoped;
import java.util.Arrays;
import java.util.List;

@ApplicationScoped
public class SubmissionValidPredicate implements Predicate {

    // The name of the antispam field that should be present in the HTML form
    public final static String ANTISPAM_FIELD = "antispam";

    // Reference the list of required fields from application configuration
    @ConfigProperty(name = "fields.required")
    String fieldsRequired;

    // Reference the correct answer to the antispam question
    @ConfigProperty(name = "antispam.answer")
    String antispamAnswer;

    /**
     * This method contains the validation logic.
     * It returns boolean false if the message passes validation, true otherwise.
     */
    @Override
    public boolean matches(Exchange exchange) {
        boolean isValid = true;

        // Loop through all required fields. If any are missing, then it's invalid.
        List<String> required = Arrays.asList(fieldsRequired.split(","));
        for (String field : required) {
            if (exchange.getMessage().getHeader(field, "").equals("")) {
                isValid = false;
            }
        }

        // Also check that the antispam field is correct
        if (!exchange.getMessage().getHeader(ANTISPAM_FIELD, "").equals(antispamAnswer)) {
            isValid = false;
        }

        return isValid;
    }
}
Inject the Predicate in the RouteBuilder
I can now inject this Predicate inside the RouteBuilder. So when Quarkus starts up, it’ll create the bean, and then it’ll inject it where I need it.
Quarkus uses CDI, so that means using the javax.inject.* way to inject beans:
Add into RouteBuilder:
import org.apache.camel.builder.RouteBuilder;

import javax.enterprise.context.ApplicationScoped;
import javax.inject.Inject;

@ApplicationScoped
public class FormEmailerRouteBuilder extends RouteBuilder {

    @Inject
    SubmissionValidPredicate submissionIsValid;

    // ....
}
Now it’s time to write the Camel routes. 🐪🐪
Step 4. Add the Camel routes
Now it’s the fun part. Writing Camel routes.
I want to separate out my form submission handling code, from the API bit. So I’m going to add two Camel routes into the configure() method in the RouteBuilder.
Route 1: Receive a request with platform-http and validate it
Here’s my first route. This first route does the validation, and then passes all valid requests on to another route.
Some notes for ya:
-
platform-httpis the recommended way to to use Quarkus’s embedded web server. This basically wires up a new API endpoint on the web server, and plugs it directly into Camel. -
Since I already created the validation logic in the Predicate (in Step 3 - yes I know that was a long time ago now), I can refer to it in my choice-when block. Result: cleaner-looking code!
-
Regular, boring HTML forms are sent over HTTP using the
application/x-www-form-urlencodedContent Type. It is essentially a list of fields inkey=value&key=value...format. Camel maps these fields to Header values automatically. Yasssssss. -
I’m quite lazy so I just return “NOOP” if the user didn’t send a POST request.
The first route that goes in the RouteBuilder class:
from("platform-http:/?httpMethodRestrict=GET,POST")
    .choice()
        .when(header(Exchange.HTTP_METHOD).isEqualTo(constant("POST")))
        .log("Received POST submission")

        .choice()
            //
            .when(submissionIsValid)
                .log("Passed validation and antispam challenge")
                .to("direct:process-valid-response")

            .otherwise()
                //Redirect to an 'invalid' page if the user hasn't passed the antispam challenge
                .log("Submission failed validation or antispam challenge")
                .removeHeaders("*")
                .setHeader("Location", simple("{{redirect.fail}}"))
                .setHeader(Exchange.HTTP_RESPONSE_CODE, constant(303)) // Redirect 303 'See Other'
                .transform(constant(""))
            .endChoice()

    .otherwise()
        .transform(constant("NOOP"));
Route 2: Process the submission, stick it in the database and email it
Next, I add the second route. This picks up where the first route finishes. This is where the integration part happens! It processes the message:
-
The submission gets saved into the SQLite database using a simple SQL
INSERTstatement with Camel SQL component -
The text of the email gets prepared using a Velocity template. This works a bit like mail merge.
-
Tidy up the headers and send the email using SMTP, with a configurable URL that I’ve set up in my
application.properties. The URL looks like this:smtp.uri=smtps:smtp.example.com:465?username=postmaster@example.com&password=xxxxxx -
Finally all of the irrelevant headers are stripped from the response, and the user is issued with an HTTP 303 response code, which will tell their browser to redirect them to a thankyou page.
from("direct:process-valid-response")
        .setHeader("timestamp", simple("${date:now:yyyy-MM-dd'T'HH:mm:ss.SSSXXX}"))

        // insert into SQLite here in case the email doesn't send
        .to("sql:insert into responses (sender_name, sender_email, message, received) values (:#name, :#email, :#message, :#timestamp)")
        .log("Saved into DB")

        // Prepare the email content
        .to("velocity:email.vm")

        // Send mail
        .removeHeaders("*", "email", "timestamp")
        .setHeader("To", simple("{{mail.to}}"))
        .setHeader("From", simple("{{mail.from}}"))
        .setHeader("Reply-To", simple("${header.email}"))
        .setHeader("Subject", simple("{{mail.subject}}"))
        .to("{{smtp.uri}}")

        .log("Sent email to {{mail.to}}")

        // Prepare the response
        .removeHeaders("*")
        .setHeader("Location", simple("{{redirect.success}}"))
        .setHeader(Exchange.HTTP_RESPONSE_CODE, constant(303)) // Redirect 303 See Other after form submission
        .transform(constant(""));
With those two routes, I’ll receive form submissions over HTTP, save them to a database, and send by email.
Get the code
Wow, you’ve made it this far. You now know the back story, and you’ve seen how I designed the app and created the Camel routes. Now you’ve seen how this Camel on Quarkus app was built, you can go check it out for yourself:
See the completed application on GitHub
What’s next?
In the next article, I’ll write some unit tests for the app, create the HTML form that will send submissions, then deploy and monitor the app!
See you then…..